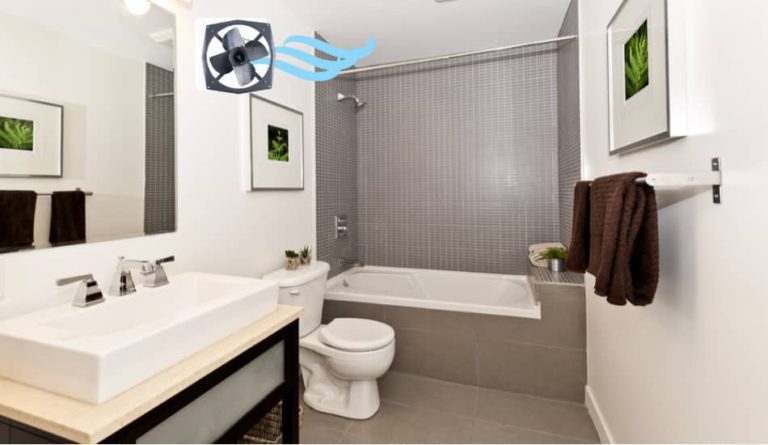

How to Install Motion Sensor Light in a Bathroom?
Did you know that installing a motion detector light in a bathroom is a manageable task that everyone can do it? It is well suited for people who are willing to put in a little bit of work to improve their home. It’s a great idea to stop the kids from leaving the light on in the bathroom. In my present house, I have two toilets/cloakrooms with PIR sensor lights.
In this article, we will guide you on a step-by-step process on how to install a motion sensor light in your bathroom. This installation process takes around 30 minutes. So let’s start!
Table of Contents
How to Install Motion Sensor Light in a Bathroom?
How to Install Motion Sensor Light in a Bathroom? To install a motion sensor light in a bathroom, you need a motion sensor and a dimmer switch or bulbs. The steps that need to be done for installation are that you first turn off the electricity, wire the fixture, mount it, and then set the rules on the motion sensor light for the on/off switch.
You want to automate the light in your bathroom to:
- Turn on when you walk in (accessible with a motion sensor)
- Turn off when you leave
- Stay on when you’re in using the shower/toilet (not much motion)
Two Options:
Regarding the motion sensor and a dimmer switch or bulbs, I would suggest a dimmer switch. When switching on, it starts at 0% and ramps up. If you utilize bulbs, they will always get on at the last level to brighten at night before turning to the desired brightness.
Next, you’ll want to formulate your controls. I highly recommend the smart app Webcore. If don’t know about it, there is a little learning curve, but it is compelling.
You’ll want to determine what is “day” and what is “night” and make commands accordingly. I advise buying a motion sensor that also senses light levels. They aren’t much more costly. With them, you can easily turn on the light depending on how dark it is in the room.
There are also switches on the market that has motion sensors in them, both Z-wave and non-smart. I have a couple of Z-wave ones. It has a “dull” mode that would work without the hub, but you can switch that off and implement the same rules as above. These don’t have light sensors in them but are the quickest reacting motion sensors I own.
How Do Bathroom Motion Detectors Work?
Motion detectors are little electronic eyes that detect infrared waves, i.e., heat waves that radiate from moving items. When the sensor senses an item moving across its field of view – in general, warmer objects such as people, animals, and cars – it automatically turns on the lights.
Where to Put Motion Lights in Bathroom?

Here are the five options where to put motion lights in the bathroom:
- Motion sensor outside of the bathroom at the door frame
- Motion sensor in the bathroom. Shower curtains are covered to IR
- Motion sensor in the right corner of the bathroom
- Humidity sensor + Rasp Pi w/ home assistant + motion sensor for non-shower bathroom use
- Hue Outdoor sensor in the shower [when it releases] + indoor sensor [rest of bathroom]
One of the common problems that can occur when you place the motion sensors near the shower is that it would also trigger when someone stepped past the bathroom door, annoyingly turning the light on for at least a couple of minutes. I set this by adding an Eve door sensor and transferring the motion sensor to only trigger after a person walked into the bathroom.
I used the more superior Shortcut in the Apple Home app to set up the following self-regulation:
- When motion is detected, turn on the light.
- When no motion is detected, if the door is open, turn off the light.
- When no motion is detected, do nothing if the door is closed (leaving the light on).
This works much more effectively now in that there’s no more “hand waving” to get the lamp to stay on when you’re in the bathroom. It merely switches on when you walk in and stays on while the door is shut. It also means we don’t need a timer as soon as the motion sensor stops catching motion, it switches off the light if the door is accessible – perfect for fast nipping in and out.
How to Install Motion Sensor Light in a Bathroom – Step by Step
1. Shut off the Electricity
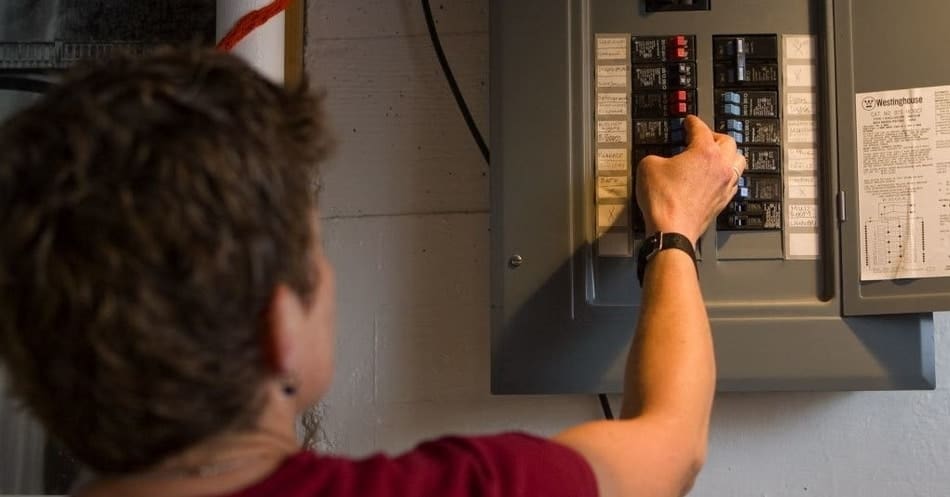
- Switch off the power to the appliance at the central panel, then test the wires to make sure the current is off.
- Rub one lead of a voltage tester upon the ground wire and rub the other lead first upon the hot wire (black), then the inert wire (white).
- If the tester lights up in each case, the power is still on. Shut off the right circuit at the main panel.
These are fantastic little testers that do not demand an open wire (that could be hot) to examine for voltage. As an ex-electrician, there is usually one in my pocket. I use it before touching any wires if there is any chance at all that they could be hot. A unique tool for the handyman doing any electrical work, they are cheap and a fitting means to provide for your safety. I sincerely suggest them.
Non-Contact Voltage Detectors
2. Wire the New Fixture and Mount It
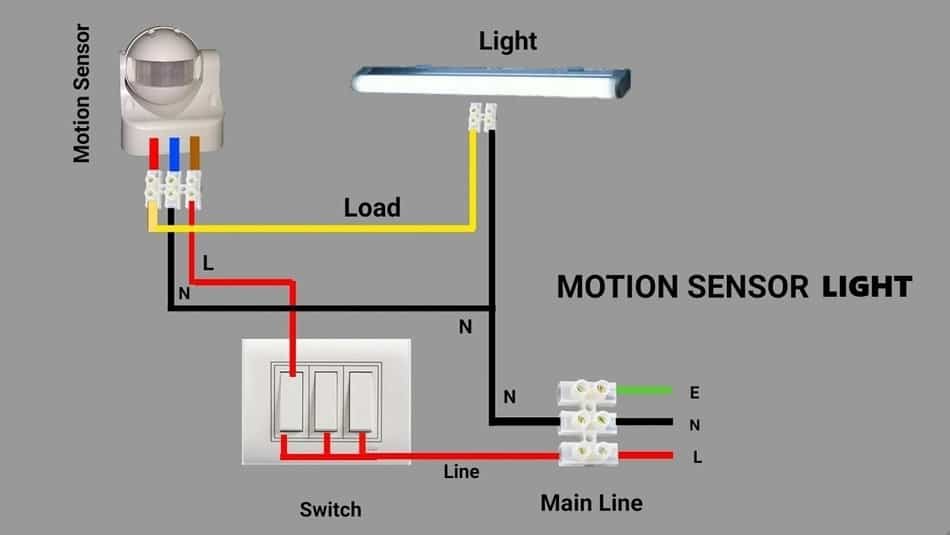
- Mount the motion sensors according to the company’s guidance.
- Run the cables through the rubber gasket.
- Then attach the neutral wires (white), burning wires (black), and ground wires (green or bare copper) with cable connectors.
Join the wires together with cable nuts. All black cables normally go together, and white cables join together, although this is not a rigid rule.
In some instances, there will be various colored wires joined together in the fixture that do not go to the light (rather to the switch instead), but at least one black cable and one white cable go to the light installation. If there’s a ground wire (bare of insulation or green in color) on the light, it will join to the ground wire in the box; if not the ground cable in the box, it will connect to a screw on the console.
Either approach is adequate; ensure that the fixture is grounded if there is a ground wire in the box. Test each cable nut by holding the nut in one hand and towing firmly on each wire; better than a low splice comes alone now than as you close the wires back into the box where you can’t see them.
Therefore, you need to attach the fixture according to the instructions and set up light bulbs as necessary.
3. Turn On the Power And Switch

The light possibly won’t come on (likely it is daytime while you are working!), but most lamps have a “test” switch on them that will switch on despite if it’s nighttime or daylight.
Check that the light works and reset the test switch to a starting position; again, most lamps have a range of options for how long the light will stay on after catching motion. The motion detector’s sensitivity can be set as well, blocking the light from turning on as it detects small animals.
4. Set the Controls

- Set the motion detector’s rules as desired. You can also change this later, if necessary, to eliminate nuisance trips.
- Also, set the timer shutoff switch. You can choose automated shutoff on most systems after either one, five, ten or twenty minutes.
Congratulations! You’ve installed your own bathroom motion sensor light, and without calling in an electrician to do a simple 30-minute job. This must be a great feeling to do something useful to improve your home rather than hiring someone else to do it.
Two Setups I’ve used (My Experience)
In my bathroom, I combined three different Lutron (not Caseta) switches.
- First one is a dimmer w/ motion sensor. I use it for the ceiling installation to turn on automatically at 50% brightness (if the room is dark enough). It also switches the light off automatically.
- Second one is a fan controller with a built-in timer. This thing is excellent. I set it to a 30-minute default program when switched on. The timer can be customized from 5-60 minutes. Double tapping the fan switch sets it on until someone switches it off.
- Third one is a plain switch to control the vanity mirror light pole. Manual on/off. That’s it.
The first two of those three are far more programmable than I presumed. Looking at the instructions paid off!
The Lutron Claro wall plates are really awesome as well. They are very clear, manageable, and fresh looking. And their 2-part layout makes it easy to change all your switches for a correctness installation (i.e., flush and straight).
The one I had in the former home had a Live, Neutral, and earth taken from a junction case in the loft to power the unit. Then the current two switch cables were fitted across the relay as usual. I have to say if it’s set up well, it’s delightful. It took me around an 8-minute timeout, where I’ve had one dark moment.
I ordered it for the sake of being able to run and hurl without missing (missus and morning sickness), and for my baby boy to be able to walk in and use the potty/toilet without worrying about a light switch.
Light fitting #1 has a halogen “lower energy” 40watt equivalent in it for instant light. Fitting #2 has a CFL that brings the lights up to full level without costing the earth. Still my favorite modification to the house.
For those who want to learn a bit more tips and tricks, I wrote 2 interesting articles which are also related to the bathroom, one is How to Lock a Bathroom Door Without a Lock, and the other is How to Set up a Hidden Camera Inside the Bathroom. So you can check them out!
Final Thoughts
Now that you have come to the end I hope you have successfully gone through all the steps and that you managed to install the motion sensor light in your bathroom with ease. Installing this should not take you more than 30 minutes of your time. If you have any ambiguities, feel free to write to us in the comments below, and we will do our best to help you.