
How To Plumb-in A Washing Machine: 8 Things You Need To Do

Today, almost every home owns a washing machine, and life without it is almost unthinkable. But what also matters is to have great plumbing installations set as well. If your installations are set up incorrectly, you will easily find yourself in a situation where your apartment will be flooded.
To put your washing machine in working mode and connect it properly, all you need to do is to follow the next 8 steps that we’ll explain briefly in a moment. Therefore, to learn how to plumb in a washing machine, continue to read this article. So, let’s start!
Table of Contents
How To Plumb-in A Washing Machine?
So, How To Plumb in A Washing Machine? To properly plumb in a washing machine you need to connect it to the right drain and supply connections and plug it in. First, turn off the main water supply, mount the hot and cold water pipes, install the washing machine valve, and then attach the hot water line to machine to complete the process.
8 Steps To Plumb In A Washing Machine
Here we’ll describe how to run water lines for washing machine. Everything will be simply explained in eight steps. Let’s start.
Step 1: Turn Off Your Main Water Supply
Disconnecting your water supply is essential before you start to connect your washing machine. This can be done on the main water supply valve, which can be usually found in your basement or even the laundry room. Therefore, it’s important to ensure that there is no case for water to be dripping from any pipe or water installations because we must secure dry work conditions.
Step 2: Build a Wall
If the area in your basement or laundry is not equipped with a wooden structure that would be used for water line connections, then you will have an obligation to compose one. The process of manufacturing a one is not so difficult for you to manage, all you need is a couple of studs to be used on both sides, and a panel attached at the bottom being insured with few screws.
Step 3: Set The Hot and Cold Water Pipes
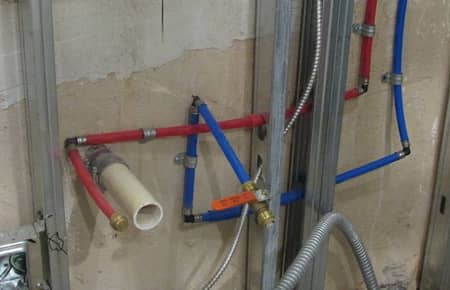
First things first, piece together the cold water line with the main water line.
In the case where you are using copper pipes, twist the bell hangers into place. These are screws looking like bells because of their shape and form, and they support the pipe.
If you can’t follow the previous step as described, you have an option to use clamps for PEX piping. Connect one line for the hot water and the other pipe for the cold water as well. They must be able to flow through the beams and head to the washing machine valve that will be installed.
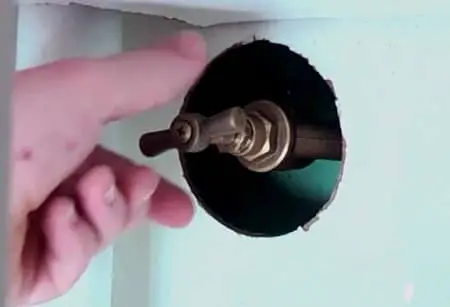
Step 4: Install the Washing Machine Valve

One of the actions that must be done in case you use cooper pipes is to see the pipes’ endings, and after that, you should cleanse the exterior of the pipes along with the inside. This can be done by using a cleaning brush. Insert flux, and then tinker the fittings to the ends of the pipes. Apply solder with caution because you can corrupt the fitting underneath it. Attach the fitting to the wall.
Washers can be connected as soon as the fitting has cooled. Screw the washing machine valve to the pipe fittings. In the case of using PEX pipes, just connect valve fittings to the pipes’ endings with a crimping tool. Before connecting the washing machine valve to the fittings, you first need to attach the fittings to the wall.
Step 5: Connect The Hot Water Line
Make sure to cut a tee into the hot water line that is linked to the hot water heater, which supplies the whole house. The washing machine`s tee can be used as a guide to position the tee in opposition to the part of the pipe you would wish to put away. After you have done that, the next thing you should do is to tag both the top and the bottom of the pipe with a marker or a pencil, pointing to the spot where you want to cut.
Wash the part of the pipe to be removed an abrasive. The part that you previously tagged with a marker should then be removed using a hacksaw or a hose cutter. You should be in caution such in case there is any water left in the pipe and for that being said be prepared to put a bowl or pan underneath the pipe to catch it.
Remove the part of the pipe, and after that put flux to both ends of the cut pipe. It would be smart to apply flux to the fittings as well. Place the tee to the ends of the pipes. Make sure to position the tee, so it fits in the desired way, and after that, solder the pipes together. In case of a tight fit, simply shunt the tee into position to complete the installation.
Step 6: Connect the Washing Machine Hoses to the Valve
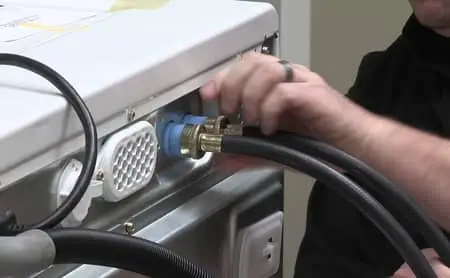
Combine the water hoses to the back side of the washing machine using an adjustable wrench. The next step is to connect the hose to the washing machine valve.
Rubber hoses are the second choice compared to stainless steel ones, and the reason for that is that stainless steel ones are heavy-duty, burst-proof, and long-lasting to eliminate leaks and flooding.
Step 7: Turn the Water Back On
Now you can turn on your house’s main water valve back on. The next step you should take is to open the cold water valve to the washing machine valve, following by turning the hot water valve on the washing machine valve. In the last step, you need to open the washing machine valves, and you are now in a position where your washing machine is ready to go.
Step 8: Install the Drain Hose
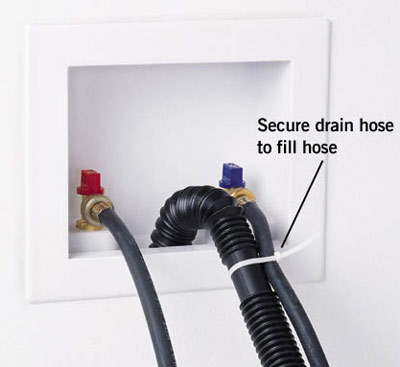
Overall, we have three types of drain systems: the floor drain system, the laundry tub drain system, and the standpipe drain system. These systems can be installed on both the floor or wall.
When you opt for drain hose installation, the proper way to install it so the washer can drain properly is to ensure that the top of the laundry tub, drain pipe, or standpipe are placed at 39 inches from the floor and no higher than 96 inches. If you’re using a floor drain, the siphon break kit is required, and it must be installed at least 28 inches from the floor so the proper drainage can be allowed.
If you have improper water flow during the process of fill or drain, it can cause various drainage issues. For example, if the drain hose is placed too low, it creates a suction effect. That way the water is able to continuously flow out of the machine with the help of gravity. If the hose is placed too high, the water will not drain properly. The consequence may be that the water flow will back into the machine.
The drain hose must be fastened securely, but loosely with a beaded tie strap so there will be no kinking. Don’t use the tape in order to secure the standpipe because it can limit the airflow, which is required for proper draining. Also, make sure that the drain hose doesn’t extend beyond 8 inches into the standpipe, laundry tub, or drain pipe because it could cause problems.
For those who want to know more, you can also read Plumbing Vent Diagram: How to Properly Vent Your Pipes.
Final Thoughts
To sum this up, the process of assembling a washing machine is quite simple in most cases. This plumbing process for a washing machine can take as little as a day to complete. Additionally, it only takes basic plumbing tools for you to connect a washing machine. If you have any more questions related to this topic, feel free to leave us a comment or to contact us.