
Plumbing Vent Diagram: How to Properly Vent Your Pipes
Anyone who needs to remodel their kitchen or bathroom will be dealing with the plumbing system. So definitely, before you get into that business, you should first know how this system works and what is plumbing vent diagram is. It all starts with basics. Therefore, in this article, we’ll start with the very basics of plumbing vent diagrams and DIY methods that you can use to remodel your kitchen and bathroom. So without too much talking, let’s get started.
Table of Contents
How To Properly Vent Your Pipes
Before remodeling your bathroom or kitchen, you need to check that your plumbing system is in good condition. For people who have never encountered this problem and don’t know anything about how to vent their pipes properly, don’t worry, we will explain everything.
There are very simple ways on how you can check that your pipes are properly ventilated. The first thing that you need to know is that every home is designed differently, so the plumbing vent diagram can be different.
For those who want to know more, you can also read Kitchen Plumbing Systems | Diagrams & Types.
How Plumbing Venting Works?
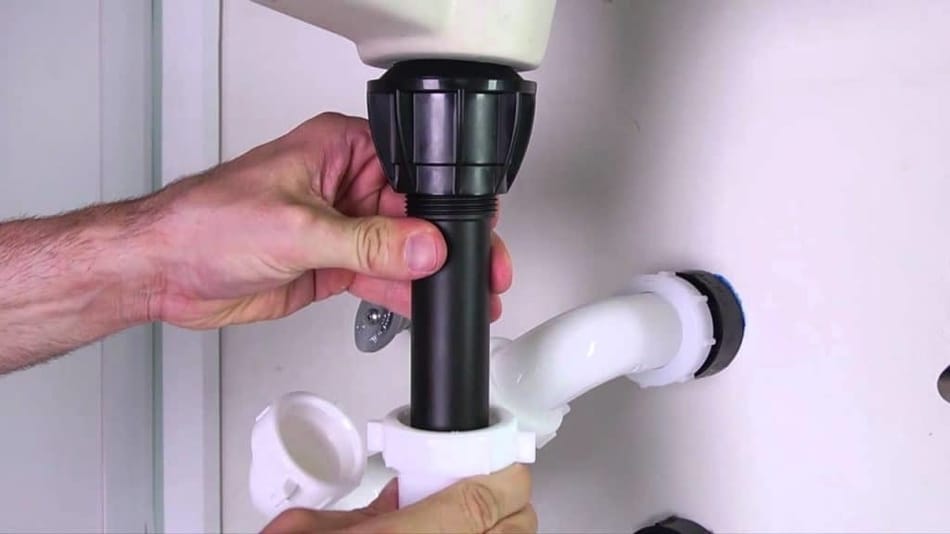
By using a plumbing vent diagram, you can easily check the built-in pipes inside your walls. The best way is to start by checking the pipes under your sink. You’ll notice that there is a P-shaped tube that is located directly underneath the drain. That P-trap tube starts the ventilation process.
The drain pipes in your wall connect to your kitchen sink, tubs, showers, and other appliances that carry water away after you’re done with it. From there, there are slightly larger drain pipes into which water moves to the stack.
The stack pipe that is part of your plumbing vent system leads through the roof and goes in the opposite direction to the main sewer lines. The gasses are vented up and outwards while the water and waste head down the pipe. That way, the stack allows fresh air to go through the piping to keep water running smoothly.
> Buy Plumbing Diagram Book HERE <
Without the stack, the home would likely reek and fill with noxious sewer gasses, as there would be no ventilation. Ventilation pipes, in most cases, are added to fixtures so the stack can do its job. That way, gasses move away from your home by using the fresh air to move sewage freely.
Therefore, it is important to know that with every home renovation, when you are repairing your plumbing system or adding a new fixture, to check that your home system works properly.
Related Article: How to Remove Hair Dye From a Bathtub?
Types Of Plumbing Vents Pipes
When installing a new plumbing fixture in your home, like a sink, the first thing you need to do is to check it’s properly vented.
Here are the four main types of vent pipes.
- True Vent – The most common type (the vertical pipe that is attached to drain line)
- Re-vent pipe or Auxiliary Vent – This vent pipe attaches to the drain line
- Common Vent – It is used between two fixtures that are installed on opposite sides of a wall
- Air admittance valve (AAV) – This is a valve that usually opens when wastewater drains
- True Vent is connected to your drain line that goes through the roof, and is aligned vertically. When the fixture rests close to the stack, it allows the stack to serve as a vent. It should also be mentioned that no water passes through them. The true vent isn’t always possible to install in a home plumbing system since fixtures are not always located close to the stack.
- Re-vent Pipes (Auxiliary Vent) are connected to the drain line that is near the fixture. They usually run over the main vent and upwards, which allows them to attach behind the fixture or horizontally to the drain line. If your sink is too far away from the main stack, this is a great option.
- Common Vent is used when you have one more fixture placed on the opposite side of the wall. That way, drain lines can tie together in a sanitary cross. Many freestanding sink codes use the loop vent as the solution—that way the ample ventilation is used just behind your fixture.
- Air Admittance Valve (AAV) is a one-way mechanical valve. This valve is usually installed at the site of a plumbing fixture, which allows the proper venting to occur where we don’t have a connection to a larger venting system and stack vent.
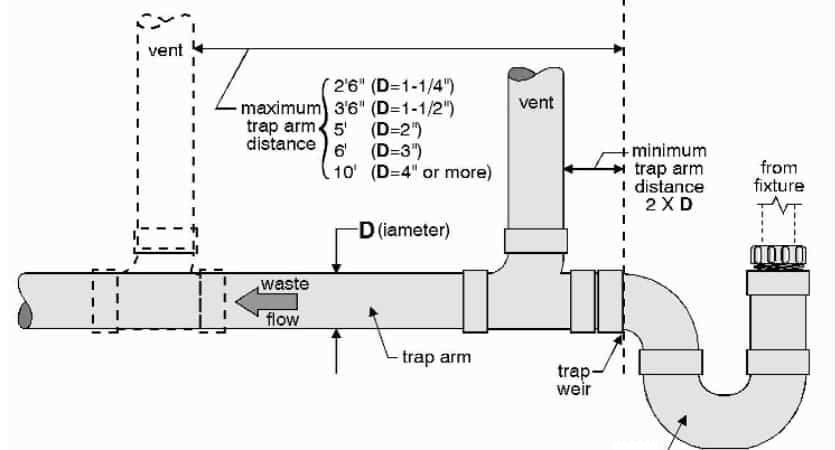
Placing Your Fixture Properly
No matter which vent system you choose, it is extremely important that your fixture is placed at a certain distance from the vent pipe. This is also known as critical distance, and it requires a precise calculation. Things that are important and play a big part in your home are the size of pipes, the type of fixture installed, and the number of wet vented fixtures.
After you’re finished measuring the length of pipes, we recommend that you consult with a plumbing inspector during this process. They will tell you which systems work the best for your home and how you need to vent your pipes properly.
Note! Try to find some experienced plumbing inspector who has worked on many such projects.
Installing the Vent
When it comes to venting pipes, they do not require slope. They can easily run as long as there are no obstacles around them. The thing you need to pay attention to is that the vent pipes need to stay dry. That’s why you will find that most plumbing vent diagrams depict them vertically, so the water can’t get back up into the system (the only exception is re-vent that runs horizontally).
That’s why you need to place them around six inches above the fixture’s flood level, so they don’t get wet. If we take the sink as an example, that would be on the rim or overflow hole.
Plan Out The Main Drain Line
It is important to plan out the drain lines when it comes to installing the vents. That way, you will minimize the risk of clogging. The kitchen and bathroom drain system are smaller than the rest of the drain system. In this way, the kitchen and bathroom lead into much larger branch drain pipes (4-inch stack).
Since the main stack is placed vertically, it is very difficult for such a pipe to be clogged. Other pipes that connect the stack are placed horizontal, which allows a large amount of water to go through them. During this process, it is advisable to have some professional staff check your main drain line to see if there is any clogging.
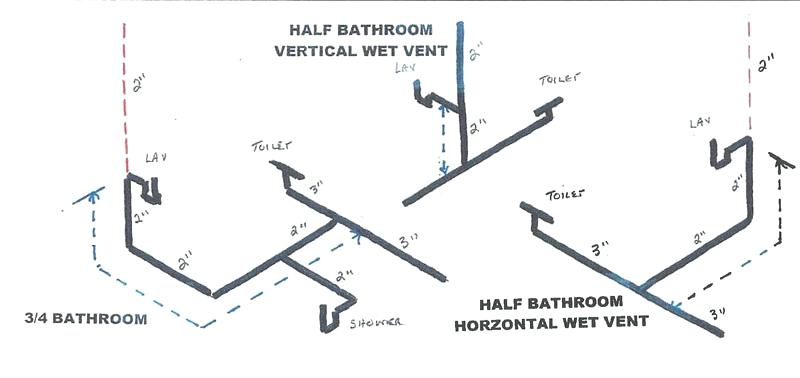
Plumbing Vent Diagrams
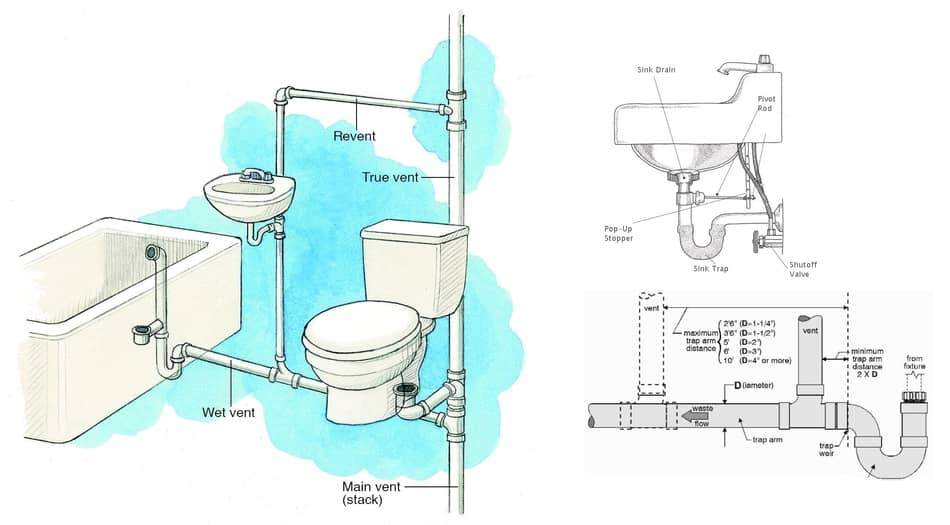
For you to better understand how the piping system works and looks, we have attached below a picture that perfectly shows the plumbing vent diagram. In that picture, you can see a typical bathroom that comes with multiple plumbing vents.
The true vent properly aligns with the stack that is located behind the toilet. Because the sink is placed further away from the toilet, a re-vent ensures that sewer gasses can escape.
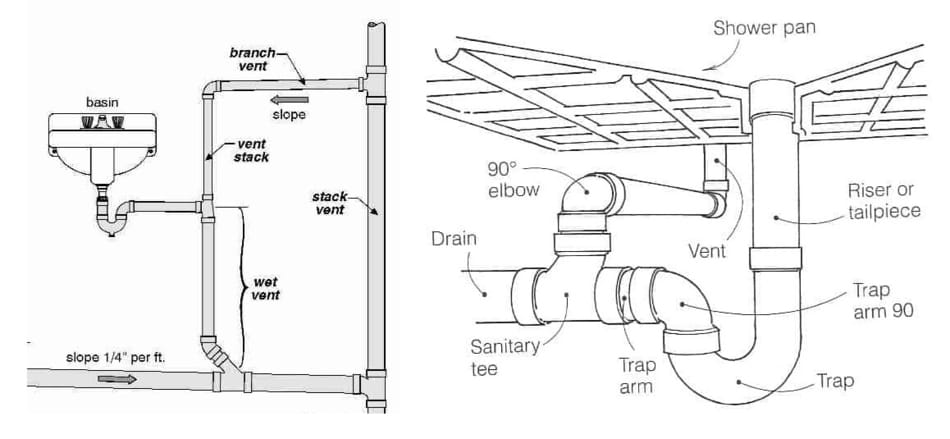
In the next picture, you can see various types of vent pipes that are placed behind a sink. One of these solutions will most likely work for your own home.
Notice how the loop vent looks like. A Loop vent is used if your sink is placed too far from the stack. Another thing that you can also notice in this picture is how the sanitary cross looks if the sink is on the other side of the wall. Both sinks are connected to one point, and they share a common true vent to the stack.
If you look from the side angle, you will get a much better picture of how these pipes might look for your kitchen and bathroom walls. Also, the main vent and waste pipe are separated behind the sink. The revert is connected with a drainage T and placed at least six inches above the overflow line.
When To Opt For Air Admittance Valve?
If you find yourself in a situation that your walls do not have enough space for the vents, then by using the local code, you will most likely opt for an Air Admittance Valve (AAV).
The air admittance valve is designed to allow air into your plumbing system when there is negative pressure from the draining. That way, the vent keeps odors and gasses out. This vent is usually attached underneath the sink, which allows enough air to go into the pipes.
Keep in mind that this method is used only if you find yourself where your wall has little room for a vent pipe. Ensure that you contact your plumbing inspector and check your local codes before you opt for an AAV.
We also cover the topic of bathtub systems, so feel free to read How a Bathtub Works? | Plumbing & Drain System.
FAQ: People Also Ask
Where Should Plumbing Vents Be Placed?
Vent pipes must be placed, so they stay dry. Therefore, their installation is done so that they are placed to the top of the drainpipe (vertically) or at least at a 45-degree angle from horizontal. That way, the water cannot back up into them.
Can A Shower And Toilet Share The Same Drain?
A shower and toilet can share the same drain, but when it comes to a waste trap arm, it can’t be shared because of sanitary reasons. The water that comes from the shower and toilet wastewater goes to the same treatment facilities.
Final Thoughts
Now that we’ve gone through the complete plumbing vent diagram, you’re familiar with proper sewage pipe ventilation, and you’re ready to start renovating your home. If you have never done work like this, we definitely recommend that you consult with a plumbing expert. Keep in mind that the plumbing vent diagram is very important to use in this project. If you have any additional questions, feel free to contact us.