
How to Install a Pellet Stove?
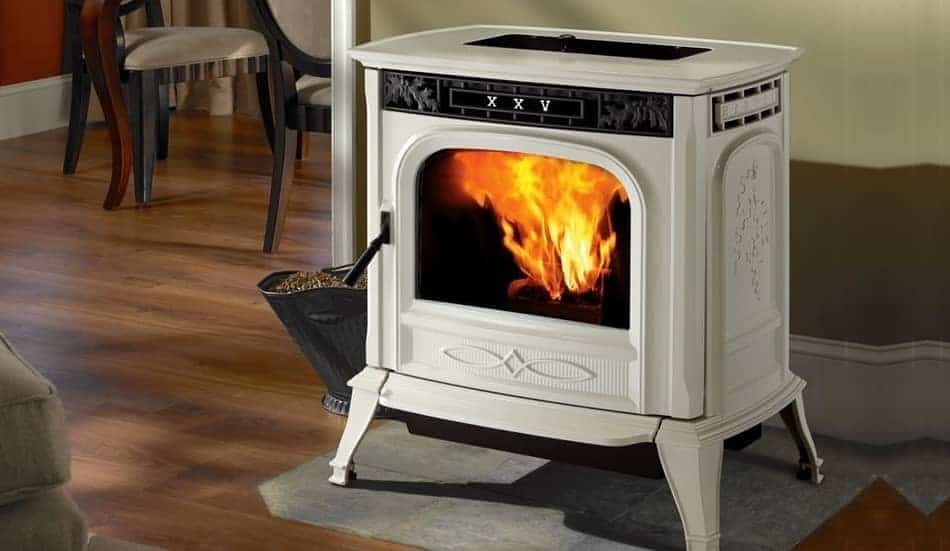
Many people are looking for ways to heat their homes in an environmentally friendly way. One of the best ways is with a pellet stove. Pellet stoves are clean-burning, extremely efficient, and can be installed in any size home. Plus, pellet stoves have some great safety features that make them a smart choice for any family. The installation process is easier than ever! This article covers the requirements and provides you with step-by-step instructions on how to do it yourself. So let’s start!
Table of Contents
How to Install a Pellet Stove?
So How to Install a Pellet Stove? Find out what size of pellets you need for your stove, purchase it, and find an appropriate location to install it. Place the chimney and vent pipe on your roof or through a wall. Connect the exhaust pipe from the pellet stove to the chimney, and install an air damper near your pellet stove in order to control how much heat is released into your room.
This is a project that can be done in as little as one day. It all starts by removing your old stove and installing the new pellet stove onto an appropriate surface, such as cement or stone slabs with insulation underneath it for good measure. Once you’ve made sure everything’s level and ready to go, simply install the bracketed shelf next to where you want your pellets stored on top of some ceramic tiles so they don’t get too hot while inside their container.
| Skill | Cost | Estimated Time |
|---|---|---|
| 3/5, Mid-level skill | From $1,500 to $3,000 | 2.5 to 5 hours |
Before Installation Learn Your Heating Needs
In order to determine the heating needs of your property, a home contractor may visit you and advise on what size pellet stove is needed. It’s important that they assess whether an open-plan or multi-story property requires more power in terms of BTUs before advising which type will work best for you. The Department of Energy recommends 60,000 BTUs as suitable for 2,000 square foot properties and anything larger should be rated at 80 – 100 000 BTUs depending on their design plan layout.
All walls surrounding the installation area should be insulated and sealed from drafts or breezes at least six inches thick so that any heat produced by the heating system does not escape outside its intended space. Secondly, there should also be no gaps between floorboards on which it will stand plus airspace above for ventilation purposes if necessary.
Thirdly, do not install near windows as this could cause overheating problems with glare coming through said window panes onto them causing discomfort to those inside while trying to enjoy their natural light source via sunlight entering into these living spaces unnecessarily; furthermore, double-check areas around electrical outlets.
Step-by-Step Pellet Stove Installation
Installing a new pellet stove in your home is easier than you think! Here are some quick and easy steps to get it done. There are 4 main steps to install a pellet stove in your home:
1. Install a Hearth Pad & Place the Pellet Stove
First, you’ll need to install a fire-resistant hearth pad in the spot where you plan to place your pellet stove. This will protect floors from potential sparks and high heat coming from your pellet stoves, preventing any chance of a fire breaking out.
Hearth pads are often made with cement or stone and should be installed before moving on to installing the wood burner itself near an electrical outlet that is close by as well as one that has a suitable wall for cutting ventilation into it.
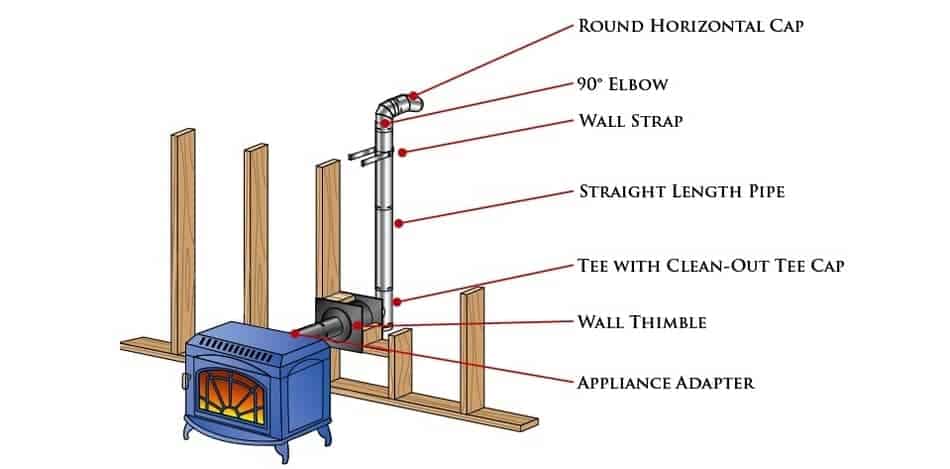
2. Make a Hole For the Vent
In order to ventilate the fumes from your stove, you need a hole in your wall. The size of this depends on what piping system you’re installing but it should be around three or four inches wide for most systems.
3. Place the Vent Thimble and Piping
The vent hole is the next step after drilling it. You need to thread a sleeve for piping and pipe through that vent hole, seal around both sides of your pipes as well as install a cap and screen on the outside opening so precipitation or debris can’t enter into your ventilation system.
4. Attach the Pellet Stove to the piping and an Electrical Outlet
The last step, find a standard 120-volt outlet and plug it to connect the ventilation piping to the stove’s exhaust pipe. Fill up your pellet stove’s hopper with pellets of compressed biomass fuel (usually made from wood) for its heat source!
Here is a great video that you can watch that will guide you on how to install it.
The Best Place For Installation
If you’re looking for the best place to install your pellet stove, it’s important that you take into account a few things. Firstly, how much space is available in your home? If there isn’t enough room, then installing one will be difficult and not worth the trouble! Secondly, make sure that if someone smokes inside the home (or has other issues with allergies) they won’t have an issue when using this type of fireplace as well. The best places for installing a pellet stove in the house are:
- Beside an Exterior Wall: Installing a pellet stove close to an exterior wall is always the best option because it will reduce your ventilation costs. Generally, you’ll install the pellet stove 1-3 inches from the walls (check installation instructions), so that there’s enough space for venting at either end of our appliance.
- Inside a Good Insulated Basement: Putting your stove in the basement is another great idea if you want to save some energy. The heat will rise up and be evenly distributed, so it’s a good choice whether or not you spend time down there (whether dealing with laundry or DIY projects).
- Near the Stairways: You might want to install your stove near a stairway because it will be more effective at heating the whole property. The heat from an open space where there is no obstruction can travel better and you don’t need any kind of special system or blower for that, but if you do, then this setup would work well!
How Much Will It Cost Me to Install a Pellet Stove?
It’s hard to say how much a pellet stove installation will cost you without knowing the specifics of your project.
Depending on how much heat capacity and hopper capacity that’s needed in order to provide enough warmth for any given room or area of space, prices will vary drastically from around $1000-$4000 with multi-fuel stoves costing anywhere from $1,500-$3,000 when all is said and done.
Freestanding models can cost as low as about $250 if there’s an already existing hearth pad but it could go up another couple hundred dollars depending on what sort of ventilation system needs installing; this also accounts for whether or not professional help is hired at some point during installation which would make things more expensive than doing it by yourself. The HAVC professional costs around $250.
Where Not To Install A Pellet Stove?
The worst place to install a Pellet stove is in your bedroom. The noise from the pellet-burning may keep you up at night if it’s near your bed, so be sure to avoid any bedrooms when installing this type of heating appliance. Another bad place you could install a pellet burning stove is in an area where the combustible substances are too close to your house. This can lead to serious safety hazards.
Can You Use a Pellet Stove Without Electricity?
A pellet stove requires an external source of electricity in order to operate. Without it, the outside temperature will affect the use and safety of using this type of heating system. For example, if the pellets are heated while there is no electrical input available for ignition or operation then they may combust violently when turned on at a later date which could cause potential injury from burns as well as damage to surrounding property and personal belongings.
Will a Pellet Stove Heat a Whole House?
A pellet stove can heat a whole house, but it will depend largely on the placement of the pellet stove. A 5000 BTU stove (the average size) is expected to heat about 200 sq ft of space at once. Pellet stoves have a long history in rural homes.
Did you know that the first consumer pellet stove was invented by Jens Tanggaard in Denmark back in 1979? In 1985, he introduced it to North America and thus became instrumental is bringing about an alternative heating system for many people from small towns who couldn’t afford traditional fuels or had no access to natural gas lines. Not only does this type of furnace heat your whole house but they are also environmentally friendly as well!
Equipment & Tools Required For Installation
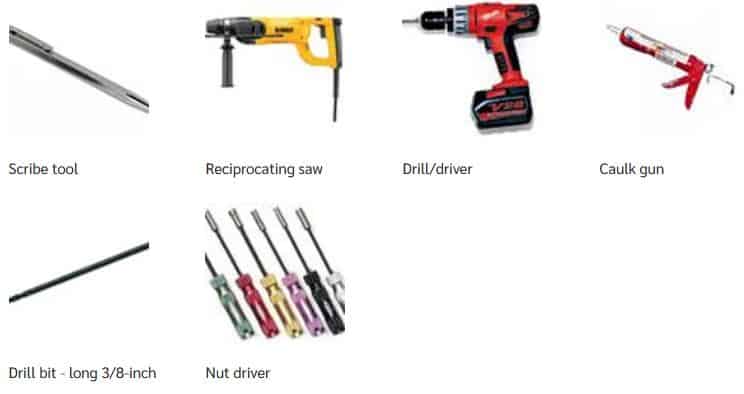
You need the right equipment to install a pellet stove. What do you need? Check out this list:
- Tape measure
- Pencil and marker pen (to mark the wall for measuring)
- Level
- Gloves
- Caulk gun
- Safety glasses
- Grinder with a diamond blade
- Cordless drill and drill bit
- Utility knife
Conclusion
Installing a pellet stove is not the most difficult project, but it does require some attention to detail. You also want to consider how much space you have around the fireplace for installation, as well as where you would like your pellet stove to be located (near an outlet or near a door).
A pellet stove is a great way to heat your home. It’s environmentally friendly, so you’re not putting any extra carbon dioxide in the air. Plus, it’s an efficient use of fuel and can save you money on energy bills! I hope you enjoyed reading this article and that you learned how to install one for yourself.