
How a Toilet Works & Toilet Plumbing Diagrams
In case that you have decided to renovate a bathroom, installing a new toilet could be challenging if you don’t know the detailed diagram of a toilet. Bellow, in this article we’ll explain a toilet plumbing diagram which sets out and labels the tank, plumbing, and toilet bowl containing a description of all parts.
A useful and detailed explanation of how a toilet works will be explained below, containing toilet plumbing diagrams along with definitions of toilet segments. So, let’s start!
Table of Contents
How A Toilet Works?
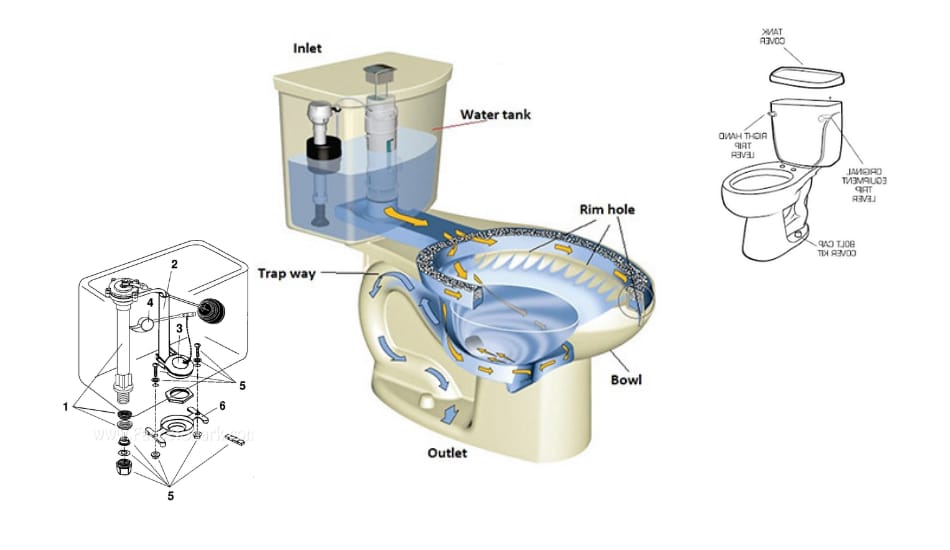
So How a Toilet Works? Simplistically, each toilet operates in three parts: First, the tank dumps water into the bowl by starting the siphon. With the help of gravity, a siphon then pulls water and waste into the bend and out to the sewer. Lastly, the new fresh water is then filled up in the tank.
The tank and the bowl are the main parts of a toilet. The bowl contains water and links to the drain for disposing of waste and waste water. The tank that is placed up behind the bowl is filled with reserve water that is used for refilling the bowl and the devices for flushing fresh water into the bowl and reloading the tank.
A ballcock is one of the devices that is connected to the water supply and it controls the delivery of water to the tank. After a flush, when the tank´s water drops quickly into the bowl, the bowl´s wastewater goes down the drain which is caused by pressure. As soon as the water level is dropped, it gets sensed by a ball, float, or pressure gauge, and this triggers the ballcock to reload the tank.
Also, be sure to read How To Properly Set Your Toilet Flange Height.
What Is A Flapper Valve?
When you flush a toilet, water in the tank flows into the bowl through a flush valve hatch. Before tripping the lever, this valve is hooked up with a rubber stopper called a flush valve set ball, tank ball, or a flapper valve or flapper ball.
The flapper valve is called because of the combination of the valve and the flapper, which is not surprising. Tripping the lever causes the lift of the rubber flapper off the valve, which then lets the water flush into the toilet bowl!
The dimensions of a flush valve are 2 ½ in size same as the ball-shaped part of the flapper. The flapper hinges on the perpendicular suffusion pipe that´s by the valve, and a little chain links the flapper to the trip lever. The precedence of a flapper over the former stoppers is that it doesn´t contain as many pieces to foul or get hung up, so it´s not much of a chance to let the tank leak or “run” in the bowl.
Toilet Plumbing Diagram – Things To Know
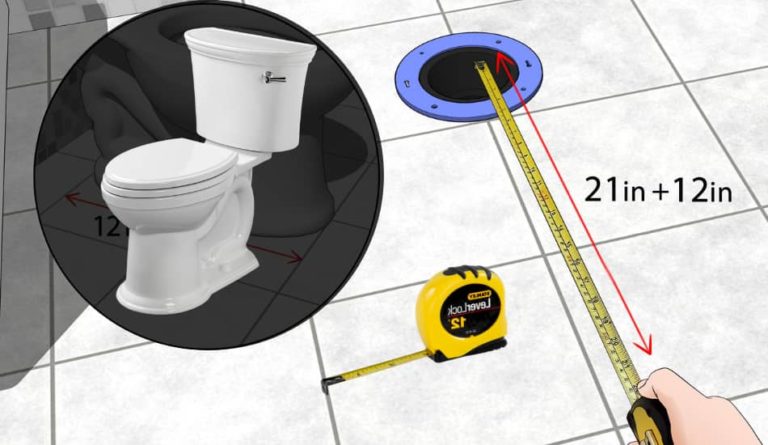
1. The Toilet´s Drain Size
Despite your plumbing code, 3 inches is the minimum drain size for a toilet. 3 DFUs (drainage fixture units) are rated for the water closets that can flush 1.6 gallons (or less). Some older variants of toilets that flush more than 1.6 gallons per flush are evaluated at 4 DFUs. A DFU can be described as a unit of possible inanition which a specific plumbing fixture produces. Drain pipes are able to drain only a specific number of DFUs.
Here you can see the following parameters:
- The IPC permits 42 DFUs on a 3 -inch building drain
- The UPC permits 35 DFUs on a 3-inch horizontal drain
*Still, keep in mind that the UPC (unlike the IPC), code sets a limitation on the overall number of toilets allowed to inanition in a 3-inch size drain. 3-inch horizontal drain that is in the UPC can take only 3 total water closets to be discharged into them.
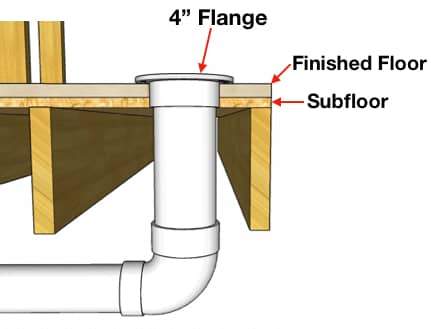
The outlet should be 3 inches, while the inlet of the fitting should be 4 inches. The plumbing code never permits a drain to be diminished in size in the direction of the flow. Still, there is one exceptional case, and it is with toilets. The plumbing code does not think about a 4″x3″ closet connection to reduce size.
This fitting is considered a great choice under a 4-inch flange!
2. The Toilet´s Vent Size
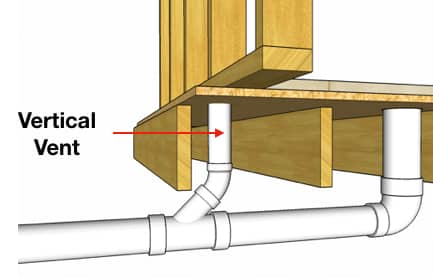
A vent is an essential part of every toilet. The measure of vent pipe depends on your local plumbing code. If the IPC is your code, then the vent size of your toilet´s individual is at 1.5″.
And the reason for that is because the individual vents in the IPC are not smaller than one-half the diameter of the drain served. The smallest possible drain size for a water closet is 3 inches, as you may know. 1.5″ is a half of a 3″ drain, which is the measure of the stool´s vent. This is due to 906.2 of the IPC.
Therefore, it is not unusual to see the UPC jurisdictions on one toilet in the home that is plumbed with a 3-inch vent. This oversized vent is meant to meet the venting requirements of the UPC´s aggregate. Briefly, the UPC desires that the building sewer be vented in the right way.
The same vent pipe (considering a diameter) as the building sewer must be linked from the drainage system, and prolonged through the roof, unmodified in dimension. Plumbing one toilet with a 3 or 4-inch vent is considered one popular way to meet this requirement. This is only for UPC, the IPS has different aggregate venting requirements.
3. The Toilet´s Trap To Vent Distance
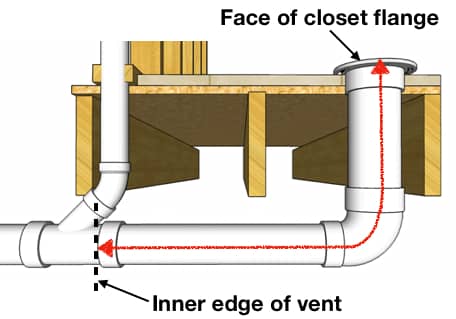
The pipe between the trap and the want is called the toilet´s trap arm and sometimes also called the fixture drain. This range depends on your local plumbing code. There isn´t any limitation regarding length for the toilet´s trap arm in case you´re in the IPC. By that being said, what that means is that your fixture drain can have an unlimited range.
When it comes to the UPC, they come with the limitation, unlike IPC. Here are the requirements that UPC wants you to have. Start the measuring from the face of the closet flange, following the centerline of the pipe, to the inner edge of the vent opening. For the ones in UPC jurisdictions, you should consider this distance is 6 feet or less.
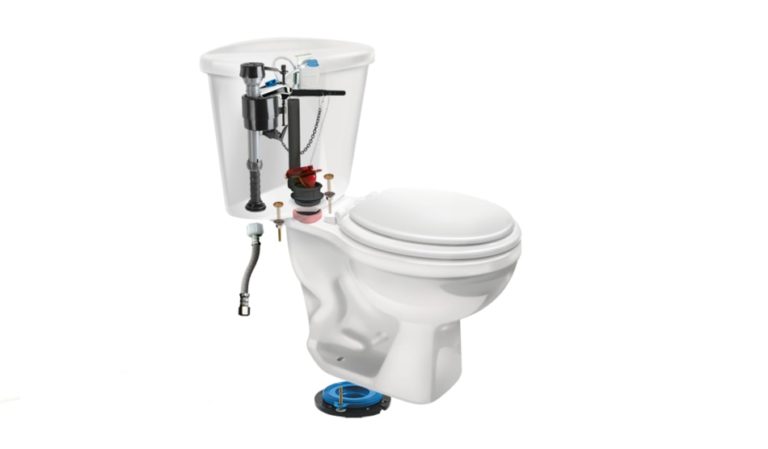
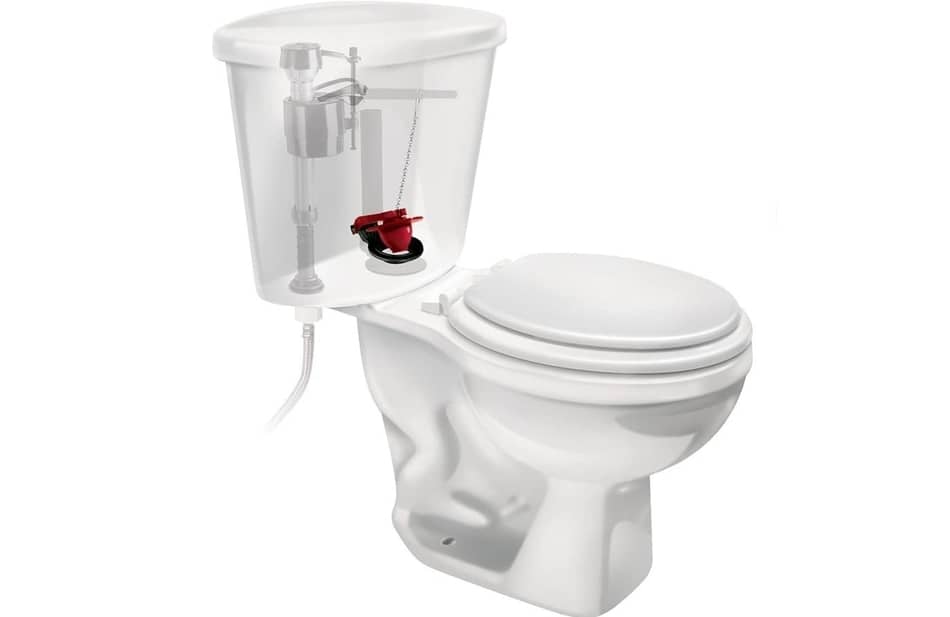
Toilet Tank Parts Plumbing Diagram
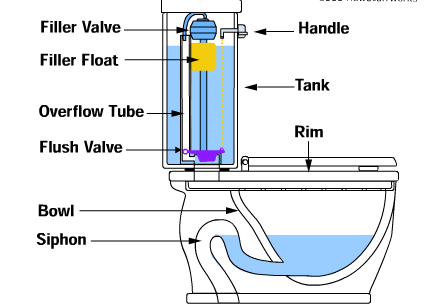
The main part of the toilet is the tank. A big porcelain box is usually placed right behind your back when you sit. The most moving parts and the most delicate ones are placed in the toilet tank. If you notice that your toilet started losing water pressure, leaking, or it takes too much time for it to refill, its problem may come from the tank.
The main parts are:
1. Toilet Tank Lever
The toilet handle placed on the outside of the toilet tank is called the flushing lever and is mostly placed on the left-hand side. The flushing process begins by pressing the lever downwards. Single flush toilets are the ones where toilet tank levers are mostly found. Push buttons are used in dual flush toilets and are placed on top of the toilet tank lid. A big button and a smaller one are usually placed there.
The difference between these two buttons is that the big one is used for a full flush, while the smaller one is used only for the half flush. The toilet tank lever can get loose and wiggly or even break sometimes. I have also taken some time and review some of the best toilet tank handles found in the market.
2. Toilet Tank Lid
The toilet tank lid is a cover that is placed on top of the tank and is made from the same material as the one used to make the toilet tank. Its purpose is to prevent and stop any dirt and pets from getting into the tank. It can easily happen for the tank lid to drop off and break into pieces. If in any case, this happens, you will have to use your toilet´s model number as a reference and order the same model to replace it.
3. Toilet Tank Flapper
A toilet flapper is a rubber seal placed at the bottom of the toilet tank. Its purpose is to allow water to flow out of the tank to the bowl just in the course of flushing but stop the water from flowing the rest of the time. The toilet tank level regulates opening and closing with the help of a slender link chain. The toilet flapper is usually one of the major suspects when a running toilet situation happens. The good thing about a toilet flapper is that you can very easily fix it and replace it.
4. The Overflow Tube
Float balls and rods are very sensitive and can easily break. The ball can get pierced by insects, leading water to get into it and making it too heavy to float. The rod also can get rusty and doesn’t move in the right way, or even the fill valve can get worn out. If this scenario happens, water will be used by your toilet continuously until it reaches the point where it overflows from the tank and into the floor.
Luckily, inside your toilet tank, you have a failsafe mechanism. The purpose of the overflow tube is to stop this disaster by allowing an extra amount of water to run out of the tank and into the toilet bowl straight. The overflow tube is commonly a tiny tube (pipe) connected to the back of the tank. Once a certain level is passed, water will start to come from the top of the tube.
The Toilet Exterior Plumbing
The exterior plumbing of the toilet involves pipes and mechanisms that let the clean water get into the tank (inlet ports) and which extracts the wastewater outside of the bowl (outlet ports).
So, let’s begin with the inlet ports:
- Flexible Hose
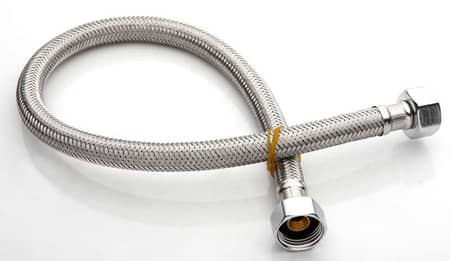
A flexible hose brings water from your main water supply to the tank and hooks up to the fill valve. Plastic is the most commonly used material to build the inside of the hose. On the other hand, steel is almost always used for its cover. Therefore, they are both flexible and firm, preventing any holes that could threaten the water pressure.
- Shut off Valve
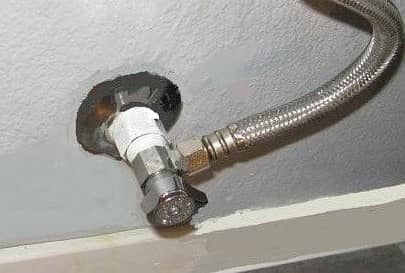
The purpose of the shut-off valve is to close the water inlet system entirely and is most often located at the beginning of the flexible hose. In case you find that your toilet is leaking, running, or overflowing from any part, the shut-off valve is the part that will end the direct problem. This stoppage will get you time to find out the actual problem.
- The P- trap Pipe
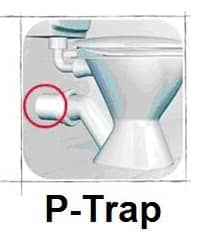
The P-trap pipe is placed just underneath the toilet bowl. This is a small U-shaped arch that retains a portion of water inside the bowl. This supports to block any unpleasant stinks of leaving whenever any human waste drops in the bowl.
- The Drain Pipe
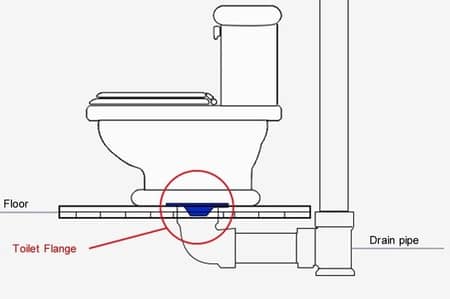
After moving over the P-trap pipe, sewage and wastewater move through the toilet drain pipe out of the bowl and get into the sewage system.
For those who want to learn more, be sure to read How Much Does It Cost To Flush A Toilet?
FAQ: People Also Ask
1. How Does a Toilet Connect To The Drain?
For disposing of waste, all toilets need to be connected to a sewer line. Mostly, we notice the toilet sitting straight over-top of the rough-in, that attaches to piping that in turn links to the city sewer system or your own septic system.
2. Do Toilets Need P Traps?
Newer types of toilets have the trap placed-in, that lets waste be flushed away. After that clean water gathers in the bowl and stops bad stink from escaping into the room. By that being said, toilets already have a P-trap built-in and don´t have to be fitted with one, unlike shower, sinks, or bath wastes.
3. Do Toilet And Shower use the Same Drain?
Yes, the same drain can be shared by both a toilet and shower, however they can´t share a waste trap arm because of sanitary and health reasons. Wastewater from the toilet and shower are sent to water treatment facilities, while the shower water is used to drain outdoors.