
How to Connect a Laptop to a TV via WiFi?
You do not need to use HDMI or VGA cables to watch videos from your computer on Smart TV. It’s much easier to sync devices over a wireless network. In this step-by-step guide, we will go through all the possible ways on how you can connect your laptop to a TV via Wi-Fi. So let’s start.
Table of Contents
How to Connect a Laptop to a TV via WiFi?
So How to Connect a Laptop to a TV via WiFi? Connecting a laptop to a smart TV via WiFi can be done in three ways: using special software, manually, or through the built-in player. On the laptop, go to ‘Settings’, find ‘Connected devices’, and click on the ‘Add device’. You will see a drop-down menu with a list of all devices. Select TV, and the screen from your laptop will start mirroring on the TV.
If you have problem Connecting Your TV via WiFi, read this article.
Using the DLNA Protocol
DLNA is a networking standard that allows streaming media files over a single router. If, for example, you download a video and put it in a public folder, it will be available to devices on the network.
To connect your TV to your laptop via Wi-Fi, you need the following:
- Router (model and characteristics do not matter).
- TV with Wi-Fi module. You can verify its presence by going to the network settings (there should be a “wireless network” item).
There are three ways to connect a laptop to Smart TV via Wi-Fi: using special software, through the built-in player, or manually. Let’s consider all the methods.
1. Manual Setting of Connection Parameters
Connecting a TV and laptop via Wi-Fi is done in the following sequence:
- Create a separate folder anywhere that will store the video broadcast on TV.
- Open the properties of this folder by right-clicking and in the “access” section, set “general access”. Select all users and click on the “add” button.
Please note: to make sure that the actions performed are correct, go to the “network” section through the explorer – the created folder should appear in it.
- Go to the “Network Connections Control Center”, in the list that appears, select the third item: “change advanced sharing settings.” Turn on sharing and turn off the password protection by checking the boxes next to the corresponding menu items.
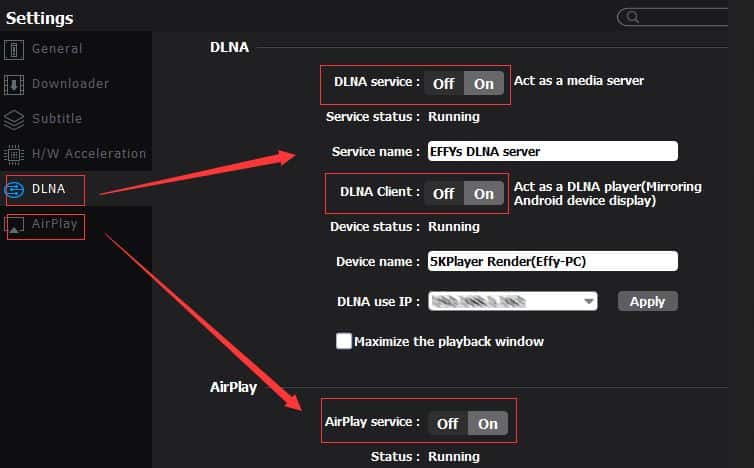
- Turn on the TV and go to the settings section, go to the DLNA section. Depending on the manufacturer, it is called differently: for LG – Smart Share, Sony – Bravia, Samsung – AllShare. If you have a different manufacturer, then the section is most likely named after the server type, i.e. DLNA.
- We are looking for the previously created connection by the folder name entered earlier. A network folder will open from which you can play videos. To add new files, download them to this folder, and they will immediately become available from the TV.
Smart TV does not support all formats, so if some files are crossed out, it means that they are in the wrong format. To open them from the TV, use the converter.
2. Synchronization With Factory Utilities
If you have a Samsung, then you can connect a laptop and a TV via Wi-Fi using a utility from the manufacturer PC Share manager. This is a program that allows you to view content from a computer on a TV screen using a wireless network, compatible with all operating systems. We do the following:
- Download the program from the manufacturer’s website
- We turn on the router (i.e. router).
- We connect both devices to the same network (SSID must be identical).
- We go to the computer “Network Control Center”. In the network settings, change the type to home, if this has not been done earlier.
- Launch the downloaded program, select the folder (where the video that you want to play is located), click on it with the left mouse button and click on the checkbox located at the top of the application.
- A new window will open in which you need to select the sections “Sharing” and “Installing Policy”.
- We move the cursor down a little and confirm the changes by clicking on the “accepted” tab.
If everything is done correctly, and the equipment is 100% working properly, then the video content will be broadcast from the laptop to the TV via Wi-Fi in automatic mode (you don’t need to confirm or configure anything). For Sony and Samsung devices, the steps will be identical (except for the software name), so we will not duplicate the information provided.
3. We Use the Built-in Video Player
Let’s use a standard Windows Media Player. To connect a laptop to a TV via Wi-Fi, do the following:
- We launch the application. If you cannot find it, we register in the search line “player”.
- In the left part of the application, click on the “Video” item with the right mouse button. In the context menu that appears, select “Manage video library”.
- A list of shared (i.e. accessible to network users) folders by default specified by the OS will appear. To add another folder, click on the “add” tab and specify the path.
- Without leaving this section, select the “Stream” item in the top menu. In the list that appears, click on the lower section. On Windows 8 and 10 it is called “Enable streaming” on the rest of the OS: “Advanced options”.
- Next, you need to enter the name of the server, by default the name of the computer appears here, but you can change it if you want. In the section below, select TV (if there are no other gadgets on the network, it will be the only one in the list) and put a tick “Allow” in front of it, then click on the “Next” tab.
- Upon completion of the settings, the system will issue a password from the server – save it, as it will be needed to connect the laptop to the TV via Wi-Fi.
- Next, go to the TV network settings, look for the created server (by the name entered earlier) and connect to it (you will need the password that the system issued earlier).
Please note that to create a server based on the DLNA standard, you need relatively powerful hardware (not older than 2010), otherwise the display of video content will “slow down”.
Synchronization Using Wi-Fi Direct
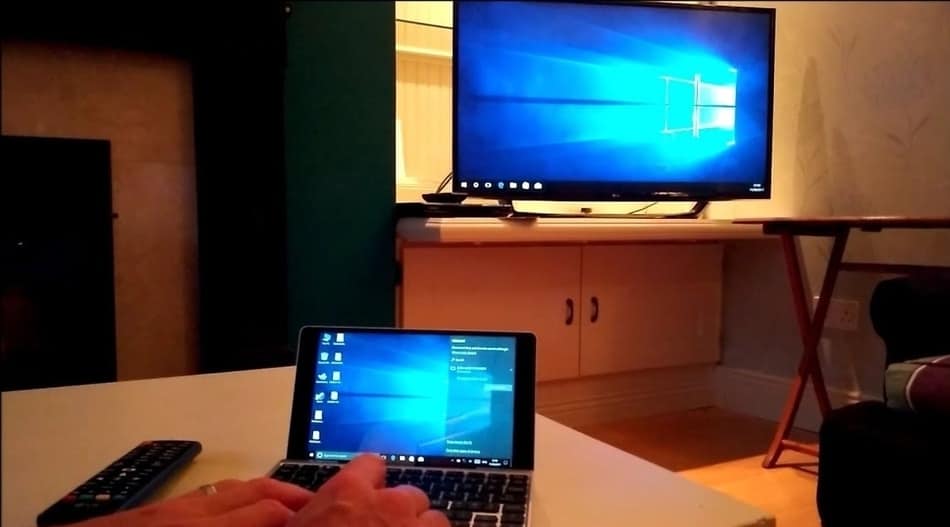
Modern TVs, starting from the fifth generation, are equipped with Direct function. In fact, these are drivers built into the system for connecting a laptop to a TV via Wi-Fi. This synchronization makes a wireless monitor out of the TV, i.e. displays everything that happens on a laptop on it.
Please note: by Direct, you can connect not only a laptop but also a smartphone or tablet (if the OS version allows).
Synchronization is supported in OS starting from Windows 7. If you are an “old-man” and are using XP or Vista, create a virtual operating system (via Virtual Box) Windows 7 and run Wi-Fi Direct through it. This synchronization method does not require a home network.
The key feature of this connection method is the ability to view everything that happens on the computer on the TV screen (surfing the Internet, working with documents, launching games, etc.). There are also disadvantages of such authentication: a small (depending on the characteristics of the network and the power of the hardware) delay and lower picture quality. To connect a laptop to a TV via Wi-Fi using the Direct utility, do the following:
- We turn on both devices and activate Wi-Fi adapters on them.
- We go on a laptop in the start menu, then “parameters” – “system” – “display”. In this section, in the “multiple displays” tab, click on the “connect to a wireless display” item.
- A window will appear, on the right side of which a list of devices recognized by the system will be presented, select the one you need and click on it. This will send a request to pair the devices.
Please note: synchronization sometimes fails on the first try, so if there is a connection error, try a few more times. This is because it takes some time for the network to transmit the encryption key.
- When pairing is complete, the screen will show what is happening on the laptop display.
To deactivate the signal, go to the network settings (section “connect to a wireless display”) and click on the “Disconnect” button.
How to Connect a Regular Plasma
If you do not have Smart TV, but simple plasma and do not want to use the HDMI port, you will have to purchase additional equipment, for example:
- Google Chromecast is a player for broadcasting photo and video content. Connects to TV via USB. Compatible with any tablets and smartphones.
- Miracast adapter or Wi-Fi adapter. These devices plug into the USB port and allow you to connect to your home server.
Study the specifications of your TV and select the optimal device based on them. However, it is easier to connect a plasma without Smart TV to a computer via an HDMI cable, this will save you from serious expenses for adapters.
Here you can read How to Connect a Mouse to a Smart TV.
Final Thoughts
Connecting a TV to a laptop can be a great thing. If you want to watch Netflix, play a game, or just look at pictures on it, there is no better option than connecting your TV to a Laptop using a WiFi. Here we have gone through three processes that are possible and that are very easy to implement. This can even be a good home hack that you can brag about to your family and friends when they come to you.